A-10
Useful Keyboard Shortcuts
- Nose Steer - Insert
- R Engine Start - Right CTRL-Home
- L Engine Start - Left CTRL Home
- Alt C - Mouselook
- Ctrl Numpad 0 - Fixed View Mode (numpad to jump around)
Cold Start
Battery Panel (Right Side Below Canopy Switch)(numpad 0)
- Battery On (left click)
- Inverter Stdby (right click)
- Optionally close canopy to reduce noise (left click hold)
Left Panel Near Throttles (numpad 1)
- Seat Release
- APU start (leftclick) (wait until 100%)
Battery Panel (numpad 0)
- APU GEN PW on (left click)
Right Lower Panel (Below CDU) (numpad 3)
Note that these need to be turned on as early as possible to reduce ILS alignment time
- CDU On (left click)
- EGI On (left click)
Spool Engine (numpad 1)
- Spool Right Engine (Right CTRL Home)
While engine is spooling, continue checklist
Left Upper Panel (9 o'clock from Throttles)
- Yaw SAS L & R (left click)
- Pitch SAS L & R (left click)
Left Top Panel (Below Primary Display)
- CICU, JTRS, IFFCC on (left click)
- PFC & MFC on (right click)
- Anti Skid on (left click)
Spool Left Engine (numpad 1)
- Left Engine Start (Right Alt Home)
While engine is spooling, continue checklist
Countermeasure Systems (Right Console Left of Canopy Switch)
- MWS, JMR, RWR DISP on (left click)
- MODE auto (right click )
APU Off (Left Panel near Throttle and Battery Panel)
- APU off
- APU GEN PWR off
- Wait for T=4.0 .08 to appear on CDU to indicate ILS alignment.
- This started when you turned on the CDU/EGI above.
- First number will gradually increase and second number will decrease for around 5 mins
- Once T=4.0 .08 and ILS is aligned, click the NAV button on CDU
- Move the stick to the left and select EGI button
- Finally, click the AAP switch to on in the autopilot module
If you fail to do this alignment process properly, autopilot cannot be turned on and will not work.
Warning Panel
At this point, unless I've missed something, all warnings should be off.
- TAD twice to select POI
- Home (zoom in)
- End (zoom out)
Maverick Init
If flying with Mavericks, their optics need to be initialized
- Select MAV on PFD
- EO Off (to turn on)
- Time should begin counting down. At 3:00, the optics are initialized. At 45:00, optic efficiency is reduced slightly.
Refuel/Rearm
- Crack the canopy so ground crew can "hear" you
- Request Rearm
- Hit the \ key to Open Comm Menu
- Hit F8 to talk to Ground Crew
- Hit F1 to Refuel/Rearm
- Select armaments and say OK
- Verify that ground crew says Copy
- Close canopy and wait for weapons to finish loading (external view or look over shoulder)
- DSMS Load (to tell the aircraft about new loadout)
- Click the DSMS button on PFD
- Click the "Load All" button and wait 30 seconds or so
- PFD will lock up until loading process is complete
Takeoff
- Flaps 7
- Nosewheel steer (Insert)
- Throttle up to taxi
- Break before entering runway
- \ to enter comms menu
- F1 to Request Takeoff
- Full Throttle once aligned on correct runway
- At 80kt (or earlier), turn off nosewheel steer to reduce sensitivity
- Rotate at 130-140kt depending on weight
- Gear Up after positive rate
- Flaps
Targetting Pod
- Reset TGP - STBY and then back to GND
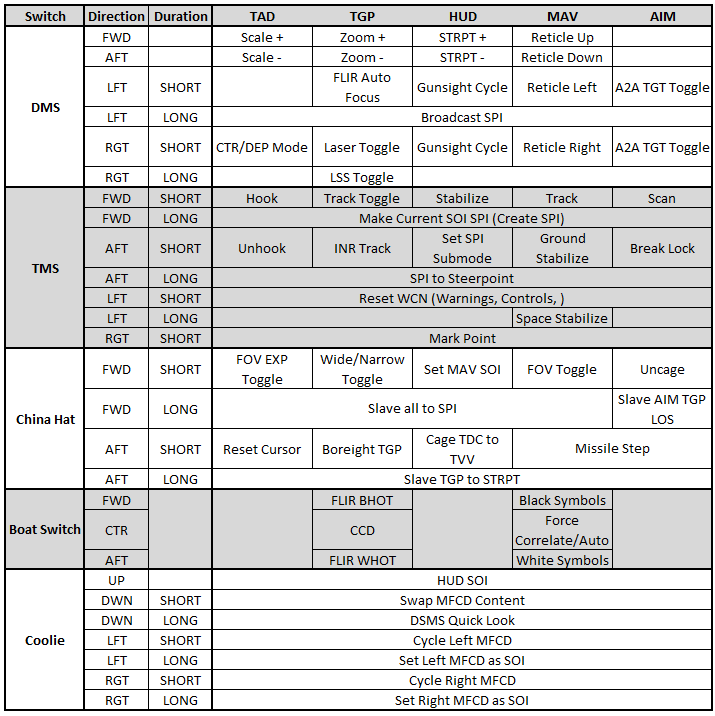
- DMS Up/Down - Zoom
- China Hat Fwd Short - NARO mode/Wide mode
- Boatswitch FWD/Center/AFT - BHOT/CCD/WHOT
- TMS up short (in Snowplow mode) - ground stabilize
Control/Laser Setup
- CNTL (Top Left OSB)
- L - Laser
- LSS - Laser Search Mode
Sensor Points of Interest (SPI)
- Create SPI - TMS Up Long
- China HAT Long Forward - Slave ALL to SPI
- China HAT Long AFT - Slave TGP to SPI

